The colors look much better in person. Must be the lighting, but the pink and green look off in the picture. Yes, I did mess up on the corners too, but I figure she will never even notice, LOL!! I tried doing dashes on the side and dots in the corners and it looked funny so I tried to turn my dots into dashes. Maybe this is not a good day to craft, ha, ha! ;)
Saturday, February 26, 2011
Birthday Wishes
Today is my aunt's surprise 80th birthday party. Made her this quick card using the mailbox from Mickey & Friends Cricut cartridge. A few handmade envies to fill it, a few Prima flowers and a little ribbon. Super Easy!
Monday, February 21, 2011
Month of March Scrapbook Page - Lots of Sparkle
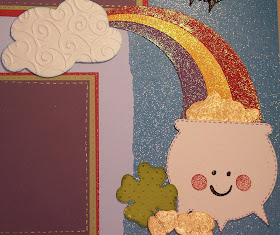
Let's chase away those winter blahs with a super bright and cheery layout. Lots of sparkle and bling to cheer you up! :)
Cricut Cartridges:
Designer's Calendar - kite, four leaf clover & March
Simply Charmed - pot o' gold & leprechaun
Pooh & Friends - cloud
Cuttlebug embossing folder - D'vine Swirl for cloud
Shimmer paints for leprechaun's Cheeks, hat and jacket
Martha Stewart glitter for rainbow and kite shadow, Liquid Pearls - gold pearl for "gold".
This was a fun one... I'm thinking I might do a themed page for each month, fill with pictures of the kids and make into a calendar for my mom for Christmas. I won't add the actual calendar pages yet as it may have to be a 2013 calendar if I don't get it done this year, Ha,Ha. ;)
Sunday, February 20, 2011
Baby Girl Onesie Mini Album - Lots of Pictures
First I must give credit to a very talented crafter and friend for the inspiration for this album. My friend Teri designed this album for a little boy and I just had to make one for my little niece that will be here soon. See Teri's Adorable baby boy album HERE. Thank you Teri!!
Onesie is from Cricut New Arrival cartridge. Embellished with dainty flower ribbon, pearls, button brads for the "snaps" and a baby buggy charm.
Stroller is also from New Arrival
Top pg - embossed photo mat with the Baby Cuttlebug folder. Then heat embossed for sparkle. Lamb is from Sugar and Spice Cricut Lite cartridge. Tags are from George & Basic Shapes.
These two pages were really fun. I used a badge holder to create a little pocket to hold a special treasure. Maybe a little lock of hair or anything small. I added cute pattern paper, computer generated little treasures and added the adorable ribbon to jazz it up. Favorites list is also computer generated.
Cute baby girl is from Cricut Everyday Paper Dolls cartridge. Face and binki are Peachy Keen stamps. Add a little pink chalk for cheeks and Glossy Accents for shine and you have the perfect little face. Of course her pig tails just make it.
Another super fun page to do. Bath tub and duck is from New Arrival. Towel and bubble bottle from Everyday Paper Dolls.
I like how the background paper looks like bubbles. Glossy Accents for shine on bottle and "water" in the tub. Rain dots for splash and water drops.
Top pg...Cute little binki from Simply Charmed Cricut cartridge. Of course I had to add a charm or "binki clip".
Moon is from New Arrival.
Every baby girl needs a dainty little crib. Crib is from Everyday Paper Dolls. Scalloped crib skirt is a Fiskars border punch. Ribbon bows to hold the "bumper pad" and of course a dream charm. I cut two of the cribs and added pop dots between them for dimension. I was going to hang a "blanket" over the top rail, but it was just too much for this one.
It was so good to finally do another shape/mini album. I will be doing more in the future as they are just too fun! The nice thing about this album is you do not need a Gypsy or Design Studio to make it. Just your Cricut and a few cartridges. Thanks for looking!
Friday, February 18, 2011
SOUS - My Valentine
Believe it or not this layout completes my term at SOUS...WOW! I'm truly sad to say...I've decided not to do another term at this time. I've had so much fun and learned so much about doing a layout from a sketch. It was a real challenge for me at first. However, life is really busy right now and I feel like I need some time to get back on track. Possibly in the future I can do another term or be a guest designer...I would Love that. I still plan to do as many of the sketches as time will allow and I will post them for you. They are also posting all kinds of tutorials so check them out Here.
For this layout I only used the Cricut for the font and it is from the Storybook cartridge. The border in the center was done with a mixture of border punches and I will list them at the bottom.
For this layout I only used the Cricut for the font and it is from the Storybook cartridge. The border in the center was done with a mixture of border punches and I will list them at the bottom.
Pattern paper is from K&Comany and it was a Valentine stack from a couple years ago.
I like how it looks like the little bird is singing sweet words. The words were stamped with different stamps in pink and brown ink.
Border punches punched and layered together are:
MS Deep Edge Heart border Punch & matching lattice heart punch
Center scallop heart is also MS, but I don't have the name (sorry)
EKSuccess wave dot border punch...I think that's the name
Sunday, February 13, 2011
Valentine Card & Treat Can
Ok, I couldn't stop with just a card. I made a batch of homemade molasses cookies and decorated the empty molasses can to match my card. Of course I filled it with cookies.
Valentine card is made with a couple older Cricut cartridges - Paper Pups and Doodlecharms. Puppy is cut at 4" and hearts are 1 1/4". It all fits perfect on an A2 size card.
Valentine card is made with a couple older Cricut cartridges - Paper Pups and Doodlecharms. Puppy is cut at 4" and hearts are 1 1/4". It all fits perfect on an A2 size card.
Inside is computer generated
As much as I love to make Valentines...this is the only one I've had time to make. Since Kara is off to college I plan to drop it off for her when I am close by, tomorrow. Glad she is only 30 min. from home! Hope you all have a Happy Valentines Day!
Friday, February 11, 2011
Quick Card by Kara
I had to post Kara's card she made for a friend. She does so much better than I with the Disney Characters. I love the blingy sun and flowers. Gives me hopes of spring. :)
I will have a new mini album to post...very soon! ;) Have a Great weekend, everyone!
Saturday, February 5, 2011
Happy Birthday Kara!!
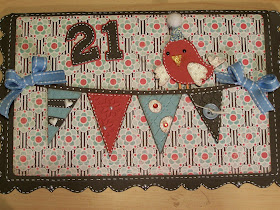
Today is my baby girls 21st birthday!! I know... she's not a baby anymore. ; ) Now that she's older...she is not only my daughter, but a wonderful friend, too. We have so much fun together and I am so blessed to have her! Happy Birthday Kara...I Love you LOTS!!! : )
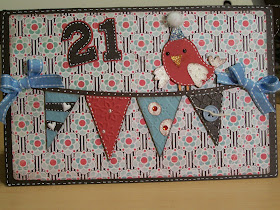
Now for her birthday card...it's probably kind of cute for her age, but I couldn't help myself and she loves cute, anyway... LOL. Birthday Bash is the only cartridge needed for this card. This cartridge is full of cute images and cards. It truly is one of my favorites!
For card base use the card feature and fit to page on a 12x12 sheet of cardstock which cuts it at 9". Cut pattern paper using the shift key and card feature at 8 1/2". Banner is cut at 4 1/2" and numbers are 1 1/4". Card and banner are on pg. 39 of Birthday Bash handbook. Use different embossing folders for each of the banner flags and add buttons and gems to help it "pop".
Notice front of card is actually square and the back is what's scalloped.
Friday, February 4, 2011
SOUS - Good Times
Here are some fun pictures taken at the bowling alley back in 2007. The Nifty Fifties Cricut cartridge was perfect for this layout. I LOVE the font as well as all the fun vintage images that's on it.
The yellow marquee is from the Storybook cartridge and the font and bowling pins are from Nifty Fifties. The red strip was embossed with the Cuttlebug polka dot embossing folder. Since this is a vintage looking layout I did not add any bling, but rather kept it very plain. I really like how it turned out...even though it's simple. Check out all the other layouts created from this sketch Here.


