Saturday, October 27, 2012

Witching you a Happy Halloween - Card

Cute little witches boot is from Cricut Happy Hauntings cartridge.

Love how easy it is to dress up with "shoestring", a little embossing and some cute little "boot socks".

Adhered boot to card with pop dots for dimension.  Sentiment is computer generated using the Beyond Wonderland font.  The messy black right around the font... that looks like ink smudge... is how it prints.  I love this font for Halloween.  Not too spooky, but kind of witchy. LOL

I am making homemade cookies to send to Kara and her friend for Halloween.  This card will go in the box for her friend.  Kara's card can be seen HERE in a previous post.   

  TFL!  Have a safe and happy Halloween! 

Thursday, October 25, 2012

All Hearts Come Home for Christmas - Layout with Lots of Cricut Cuts

This was one of the most frustrating layouts...Ever!  I do not know why, but nothing would come together right! :(  In the end I think it turned out OK, but I still feel it's lacking something.  However,I was just ready to be done!!
I love the pattern paper from BoBunny.  It's double sided snowflake and red & white dots.
Lantern is from Christmas Noel, horse & sleigh is from Joys of the Season and gifts are hand cut.
House is from Sugar & Spice and is the same house as my fall layout.  This time I added a chimney and trim to the upper dormer.

Wreath is made with the Martha Stewart Branch punch.  Snow is a mix of glitters.
Trees are from Paper Doll Dress Up, mailbox from Mickey & Friends...I think and sidewalk is from Mickey & Friends.

Thank you for stopping by.  Have a Wonderful Day!!


Wednesday, September 26, 2012

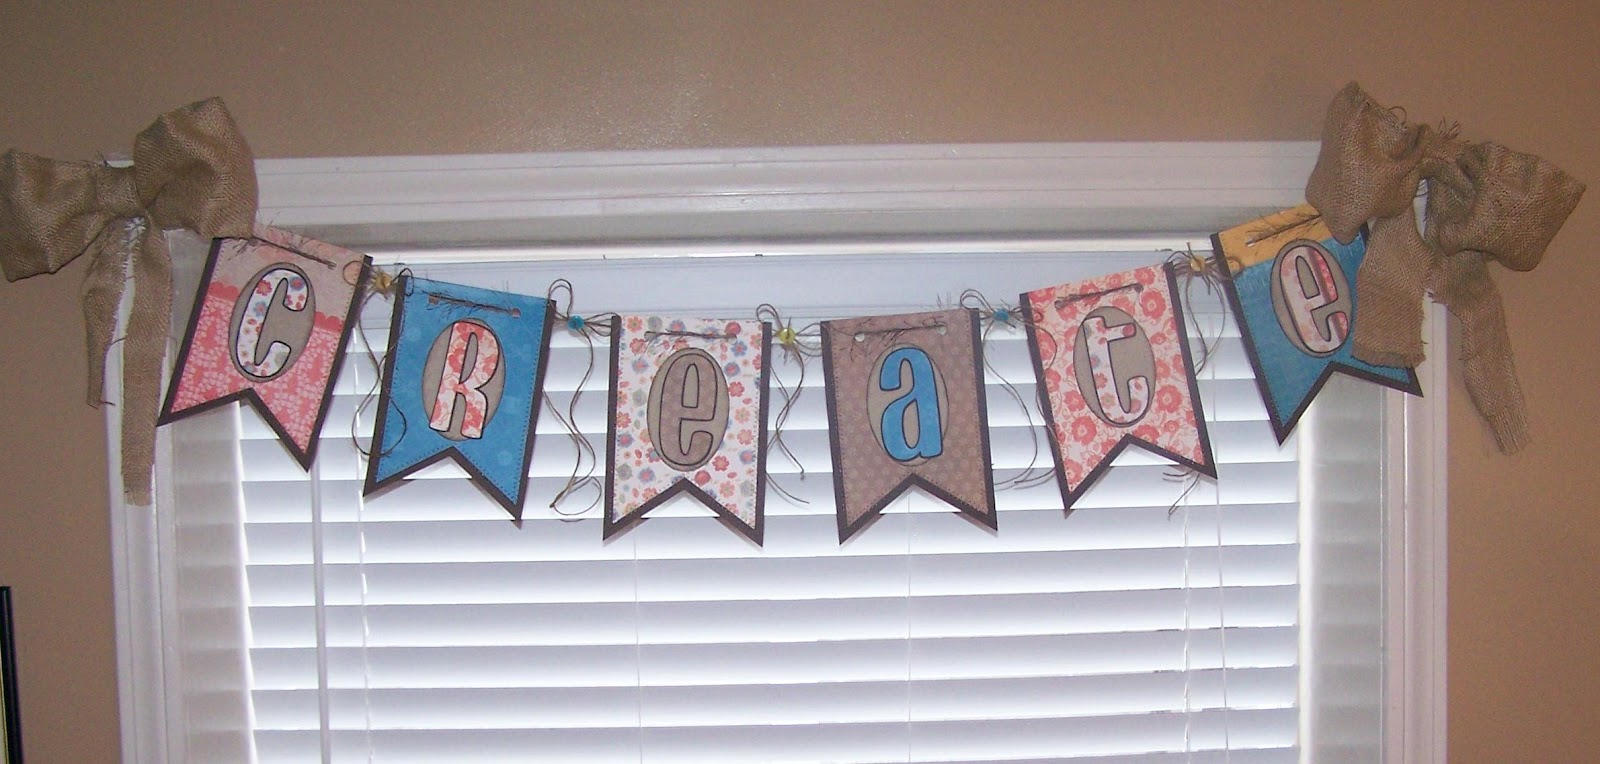
Banner from Cricut Birthday Bash

I recently moved my craft room to my daughter's old room.  Since it is painted with very pretty neutral colors I am not going to paint as I was going to have to do in my son's old room.  I could never get in the mood to paint that room so I never decorated it.  Now ... I can finally decorate! :)  Once I get everything organized I will post pictures, but for now, here is a banner I made for my window.

Pictures are kind of hard to see, but you can click to enlarge and see much more detail. :)
Banner is from the Cricut Birthday Bash cartridge and cut at 7 1/2".  

To create the burlap bows I cut a strip of burlap and folded each edge over thin floral wire and secured with hot glue.  Then I could easily shape it into a bow.

Letters are from Don Juan and cut at 4"

Ovals are from George and Basic Shapes and cut at 4 1/2".  Then embossed with the Cuttlebug Floral Fantasy embossing folder.

Pattern CS is from the DCWV Crafty Stack.  Dark brown CS is SU! Early Espresso and tan CS is SU! Crumb Cake.  To finish the  banner I zigzag stitched around the edge.

Jute twine bows & buttons between each letter.  I like the long wavy tails on the small bows.   TFL!


Tuesday, September 18, 2012

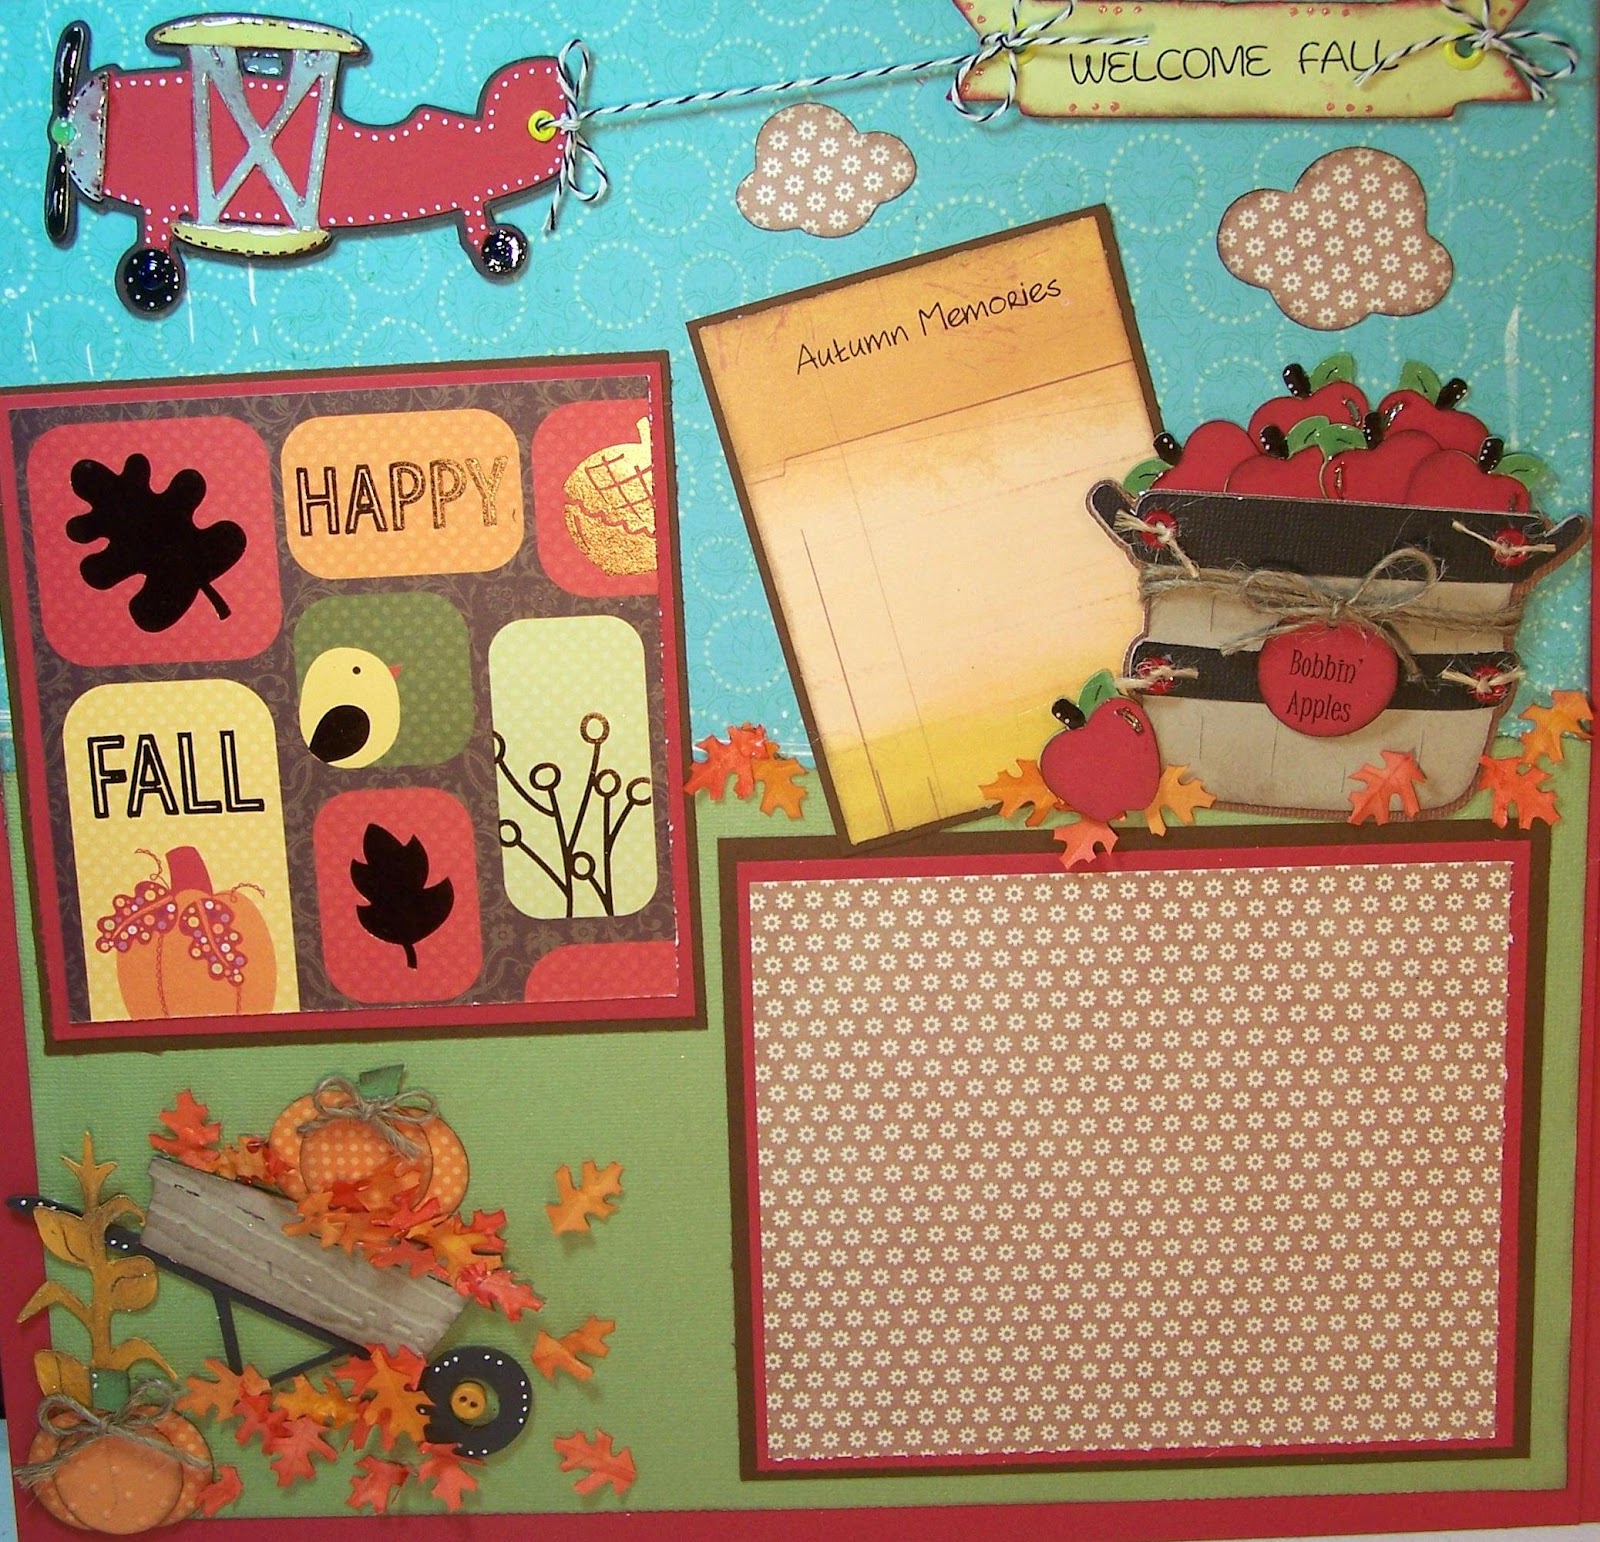
WELCOME FALL LAYOUT ... LOTS OF CRICUT

Lately I've been mostly making cards and have not done a layout in quite sometime.  I did not realize how much I missed it!  I had so much fun designing and creating this fall layout.  There's something about bringing die cuts to life that has me addicted! :)


Somehow I managed to get lots of die cuts and details and still have four nice size photo mats & a big journaling tag.  
I had to be careful adding so much to my pages as it could have easily became overwhelming and gaudy.  I think the key is choosing the right colors and patterns of paper, doing larger die cuts and the placement of the cuts.  

I will give all the details on cartridges used at the bottom of this post.  For now ...here are lots of pictures.  Click on them to enlarge.     
 I Love the look and dimension of the walk way.  It's the perfect fall stroll to the inviting little cottage.  

Love the wheelbarrow bursting with leaves and a cute pumpkin.  Of course it's not fall without a bushel of apples.  These apples are of the bobbin' kind. ;)  Then we have a cute little plane flying overhead with it's welcome fall banner.  I debated if it was too much and decided it should stay. :)

Here are some close ups ...


Now just for fun...as I plan to do it like it is...but you can switch the pages around and it will look like this...

I like it this way too...but it just looks  better to me...the other way.  Maybe because that was my original plan, but the more I see it this way I do kind of like it. :)  What do you think?

Now for the Details...Details...Details...

  
Cricut Cartridges:

POP UP NEIGHBORHOOD - AIR PLANE
NEW ARRIVAL - WELCOME FALL BANNER & CLOUDS
DOODLECHARMS - BUSHEL BASKET & APPLES
FRESHLY PICKED - WHEELBARROW
STRETCH YOUR IMAGINATION - TREE
MICKEY & FRIENDS - SIDEWALK & FENCE
PAPER DOLL DRESS UP - CORN STALKS
SUGAR & SPICE - HOUSE

I do not have all the sizes for my cuts, but the house was cut at 5 1/2" and the plane at 2"...if that helps.
Pumpkins are 1" circles glued together.  Leaves are silk leaves from my stash and are approximately 3/4".  Lots of embossing with various folders.  Other extras include ink, Glossy Accents and jute twine.
Thanks for looking!


Wednesday, September 12, 2012

Pinterest ... Tried & True or Tried & Blue

Like many of you I am totally hooked on Pinterest.  It is a daily stop I make while having my morning coffee.  It inspires me from the craft room to the table and everywhere in between. :)  Today I finally started a new board that I've been meaning to do for sometime now.  Tried & True or Tried & Blue ... I plan to use this board to post the recipes I've tried and will or will not make again.

Mostly this board is for my own personal use.  You see I have hundreds of recipes posted to my recipe boards.  This poses one big problem ... it's hard to find a recipe without sifting through page upon page of recipes.  Sometimes you can't remember the name of the recipe or you forget about certain ones.  Unless you copy them all into your hand written recipe file of which I don't do... it can be almost impossible to find them once they're buried beneath hundreds of new pins.

So ... I now have a new board that will only include recipes I've made personally.  This will make it easier to keep track of my favorites without endless amounts of time spent searching.  I am also including my not so favorite recipes ... so I remember that I have tried it and for whatever reason probably won't make again.  I will try to include a very short word or two such as Amazing or as to why we liked or didn't like.  Of course this is only my opinion based off of my families likes or dislikes.  We tend to lean towards down home cooking and comfort food.  Recipes with basic ingredients and without a lot of fuss.  Remember we all have different tastes and I'm not responsible for a recipe I give rave or not so good reviews and you end up thinking I'm crazy, LOL.

If you have certain recipes you've been wondering about you can check my tried & true or tried & blue board HERE to see if it's listed.  If you've tried the same recipe and have a different opinion please feel free to leave a comment as to why you did or didn't like it.

Edit:  I am just getting started so it may be a few days before I get all the recipes onto this board.  I only have a few at the moment.        
        

Tuesday, September 11, 2012

Birthday Cake Gift Box Tutorial

Here is a fun little box for gift giving.   I decided to do a step by step tutorial for you.  Although I am contemplating getting back to doing a few video tutorials in the near future.

  
Picture taken before adding final embellishments.

Note: I designed this and did the tutorial as I went ... so it's not perfect.  I had to make some edits along the way and I will list them below.  The candle is somewhat different than what I had in my head.  I will explain later. :)  Also, depending what size your tea light is you may need to modify the size of cardstock used to decorate it.

The idea for decorating the tea light came from HERE.


Let's get started ... You will need two different, but coordinating sheets of cardstock and a sheet of chipboard (optional).  Depending on what you plan to put in your gift box, the chipboard will make it a little more sturdy.


For my scallop circles I used the Cricut Mini Monograms cartridge.
From cardstock pattern #1 (pink polka dot for me) you will need to cut:
2 - scallop circles at 5 1/4" - the top & base of the cake
1 - scallop circle at 2 1/4 " - the base of the candle


From cardstock pattern #2 (white with butterflies for me) you will need:

2- scallop circles at 2 1/4" (for you observant viewers ...yes ... in the picture the scallops are different sizes, but the larger one didn't look right ... so this is edit #1) - for the candle & tea light.
1 - 3 1/2" x 12" piece - for body of cake
1 - 1/2" x 4 3/4" strip - to wrap around tea light (check size of your tea light).
1 - 1 1/2" x 5 1/2" piece - for the candle


Chipboard: 1 or 2 - 5 1/4" scallop circles (to reinforce base and or lid of cake).  If cardstock is not sturdy or contents will be heavy you will want to reinforce both the top and bottom.  For mine today I only did the lid.
1 - 3" x 11 1/4" piece - as an insert to reinforce cake (optional)

Other items needed:  battery operated tea light, thin magnets, tissue paper tube, ribbon and any other embellishments you might want to add.


Score down the length of your 3 1/2" x 12" piece of CS at 1/2".

Add adhesive to the short end of your CS and roll into a circle.  Slightly overlap ends and adhere together.  I find the red double sided tape (I think it's called Terrifically Tacky Tape) works well to securely keep ends together, but use adhesive of your choice.  My red tape is 1/4" so that's how much my ends overlap.

Next on the side you scored ... make a cut up to the score line.  Do this all the way around your cake every 1/2" or so.  Then fold the little tabs down.  You are now ready to attach it to one of your large scallop circles.   If you are using chipboard to sturdy your  base scallop ... adhere it to your base scallop now.  Now you are ready to attach your cake to your scalloped base.  I used hot glue for this.  If you are adding the chipboard insert to the inside of your cake box you can add it now.  Just roll it into a circle and slide it down into your box.  Now set it all aside. 

Cut your tissue tube down to 1 1/2" tall.

Adhere your 1 1/2" x 5 1/2" CS to your tissue tube.

Now adhere your 1/2" x 4 3/4" to your tea light.  I used my ATG for this.

Now take your 2 1/4" scallop circle in matching CS pattern and make a hole in the center to slip over the candle flame.  I used a regular size hole punch and eyeballed it.  Then I slid punch over just a bit and punched a partial hole ... so it's the size of one and a half hole punches.  Make sense? ;)  You can also view the original tutorial for the tea light by clicking the link at the top.


Now adhere the tissue tube candle to the small scallop circle in coordinating pattern.  I used hot glue around the inside edges to do this.

Here's a big edit for the candle.  You see, my tea light fit in my tissue tube perfectly and it looked like one big, perfect candle.  However, there was one small  problem.  It was too hard to lift out to turn on and off.  You could do it, but it wasn't the easiest.  So I decided to add a small scallop to the top of my tube and use magnets to adhere my tea light to the top. 

Of course you could omit the tissue tube completely and place the tea light directly to the top of the lid with magnets.  But ... that defeats the whole idea of a big ...over sized candle. :)

So I added a thin rim of hot glue around the top edge and set my scallop on top.  Make sure you quickly press it down and get is as evenly as possible OR your candle will be lopsided.  :)  How do  I know this ...because I was busy trying to write things down, work around the tripod that held my camera and take the pictures  as I was doing it.  And I wasn't quite fast enough and had to work with it a bit, lol.  


Now you can adhere your thin magnets.  Hot glue one to the top of the candle and the one on the bottom of the tea light will not need glue.  I think the battery in the tea light attracts it enough to hold in place.  Now I wonder if you actually need the top and bottom of the magnets or if one will do?  Hmmm, I will have to look into that later.
My magnets are by Basic Grey and I found them online at JoAnn's.com.

Balancing the tea light on the magnet along with the on/off switch may cause it to not sit perfectly flat.  If you have this issue you can add a pop dot to the bottom of your light.  Just leave the protective covering on the bottom of your dot so it doesn't stick to the cake.

Now adhere your candle to your large scallop lid.  I did this with hot glue and the messiness was all hidden under the small scallop on the candle.  See there is a method to my madness. ;)

Then I tied a pretty ribbon around the base of my candle.  By doing the tea light this way it looks like a two tiered candle, where as if the tea light was sitting down in the tissue tube ... it would look like one large candle.  I may have to work on this a little more and see if I can find a better way, but for now this is it.


Now for a BIG EDIT:  Originally I was going to simply set my scallop lid on top of the cake.  Then I decided it just wasn't secure enough for my liking.

 To remedy this I cut a strip of chipboard  that was 1" x 10" and scored the length of it at a 1/2".  Then I made cuts up to the score line on one side, folded down the tabs and adhered to the underside of the lid. Before attaching to lid I shaped it to the inside of my cake and held the ends together until I got it attached to the lid.  Now when the lid is in place, the added strip of chipboard sits down in the cake.  Are you with me? 


Notice my circle is a little short so next time I will cut the chipboard strip at 11" long ... I think that would be about right.


But at last ... even with my trials and errors ... it does ... kind of ... resemble a cake ...right?! ;)  Now you can embellish with flowers, buttons or whatever you like.  

Whew ... that was a lot.  I hope you have been inspired.  TFL!