Saturday, December 17, 2011

Christmas Cards

A few cards I made this morning for the family.  I haven't crafted much lately so I really enjoyed digging through all my Christmas papers and getting creative.  So much fun! :)

I really like how this card turned out.  I used the Tim Holtz die for the scalloped rosette and attached a pretty bird die cut from K&Company.  I added extra detail by sewing around the edge of the mats and adding some ribbon.

I actually made the house on the front of the card some time ago and decided to use it today.  I think it is from the Jolly Holidays Cricut cartridge...I think.  I added Glossy Accents to the windows for some shine.  The wreath is made with the Martha Stewart Branch punch.
These two cards were so fun to make.  I used George & Basic Shapes to cut out the ovals on the front of the cards.  The ornament, Christmas tree and Santa are die cuts from K&Company.

Fun, Fun, Fun...did I already mention that? ;)
I was getting tired so the last two are pretty quick and simple.  However, I just had to make one more rosette...these little cuties are so addictive to make.  I just recently got the die to make them and it took me a couple tries to get the hang of how to do it, but now that I've got it...I'm hooked.  Guess that means I need the new Cricut Ribbons and Rosettes cartridge...oh fun! :)  Thanks for looking and have a Wonderful day!


Update...for those wanting the Tim Holtz Paper Rosette die...you can find it at Joanns.com and the item number is # 10770493.

Wednesday, November 9, 2011

CARDS AND MORE CARDS

First is a fun winter card made with the mittens on the  Simply Charmed Cricut cartridge.  
My sweet daughter was craving peanut butter fudge and I couldn't resist making a batch to take to her at college.  Of course I had to make this card to go with it. ;)  I know it's not exactly winter yet, but the day her dad and I delivered it we were taking her to get a new winter coat so it was appropriate. :)


Inside of card


Next is an invite to a cookie/candy making party.    Images are from the Gingerbread cartridge.


Last, but not least is a super cute and sparkly birthday card that my daughter made for a friend of hers.
I believe this card is from the Simply Charmed cartridge.  She added lots of bling...gems, glitter, liquid applique and little tiny hearts.

Saturday, October 15, 2011

7 Up Biscuits - Amazing


This is not a crafty post, but I had to share the link to the most AMAZING biscuits ever!  At least I think they are. :)  They take 4 ingredients... one of which is 7 Up...yes 7 Up, along with three other basic ingredients.  They are light and fluffy and practically melt in your mouth.


To go to Monster Mama's site and the recipe click Here.  Bet you can't eat just one. :)   Thanks for sharing your recipe Monster Mama!
 

Happy 4th Birthday Card


A bright and fun birthday card with the Birthday Bash Cricut cartridge.  Giraffe is cut at 5 1/2" and the number 4 is cut at 5".  Background is embossed with the Cuttlebug Birthday embossing folder.  Card is embellished with Liquid Applique and Stickles.

Inside of card...printed cardstock is from the DCWV Celebration stack.

Tuesday, October 11, 2011

BARN SHAPED ALBUM

I finally finished my super easy to make barn shaped album.  The only Cricut cartridge needed to make the base of the album is My World or any cartridge  with a barn and the blackout feature.
  To cut the barn use the blackout feature along with the fit to page button and a 12x12 sheet of chipboard and again with cardstock for the front and back of the album.  Remember for the trim you will want to turn fit to page off and manually set the size to the size the barn cut at.
 I hand cut the barn doors/pages of the album at 5" tall and 4 1/2" wide.  I cut in chipboard and covered in decorative cardstock.
 I used my gypsy to size the rectangles from the George cartridge for the trim on the barn doors. 

 Animals are from the Animal Kingdom cartridge and hay bales are from the Old West cartridge.
 I have not embellished the pages yet as I wanted to add my pictures first and then see what fits.


 I used the Bind it All to bind my album, but you could use a hole punch and binder rings.
It felt good to get back in my craft room and make an album. :)  Thanks for looking!

Monday, October 3, 2011

UPDATE AND THANK YOU...

First and foremost I want to thank each and everyone of you for all the emails and comments I've received.  Your friendship and supports means so much.  Thank you all!!!

Life is better and things are looking up.  We are a family of faith and our faith has got us through many things in life.  God is good.  Another great inspiration to my family is an amazing woman by the name of Joyce Meyer.  You can go to her website HERE.  She has a tremendous personal testimony and such words of wisdom and faith.

Now for some crafty fun...I am working on a new shaped mini album.  The best part about this album is you will not need a computer, Design Studio or the Gypsy to create it.  It can be done with your Cricut Expression machine only and that means it really is easy to create.  I will post all the details and pictures as soon as I get it finished.

Again, Thank You All and Have a Wonderful Day!    

Saturday, June 25, 2011

TAKING A BREAK

Thank you all for continuing your support of my blog.  I felt I needed to let you know I will be taking a break for now and will not be posting as regularly.  My family has had a tough year in every sense of the word and I need to step back and put my family first.  Keep us in your prayers if you will. 

Chipboard - I will continue to support the sale of my chipboard.  Let me know if you have any questions.  

Friday, May 27, 2011

LAYOUT & CARDS - CRICUT PRESERVES

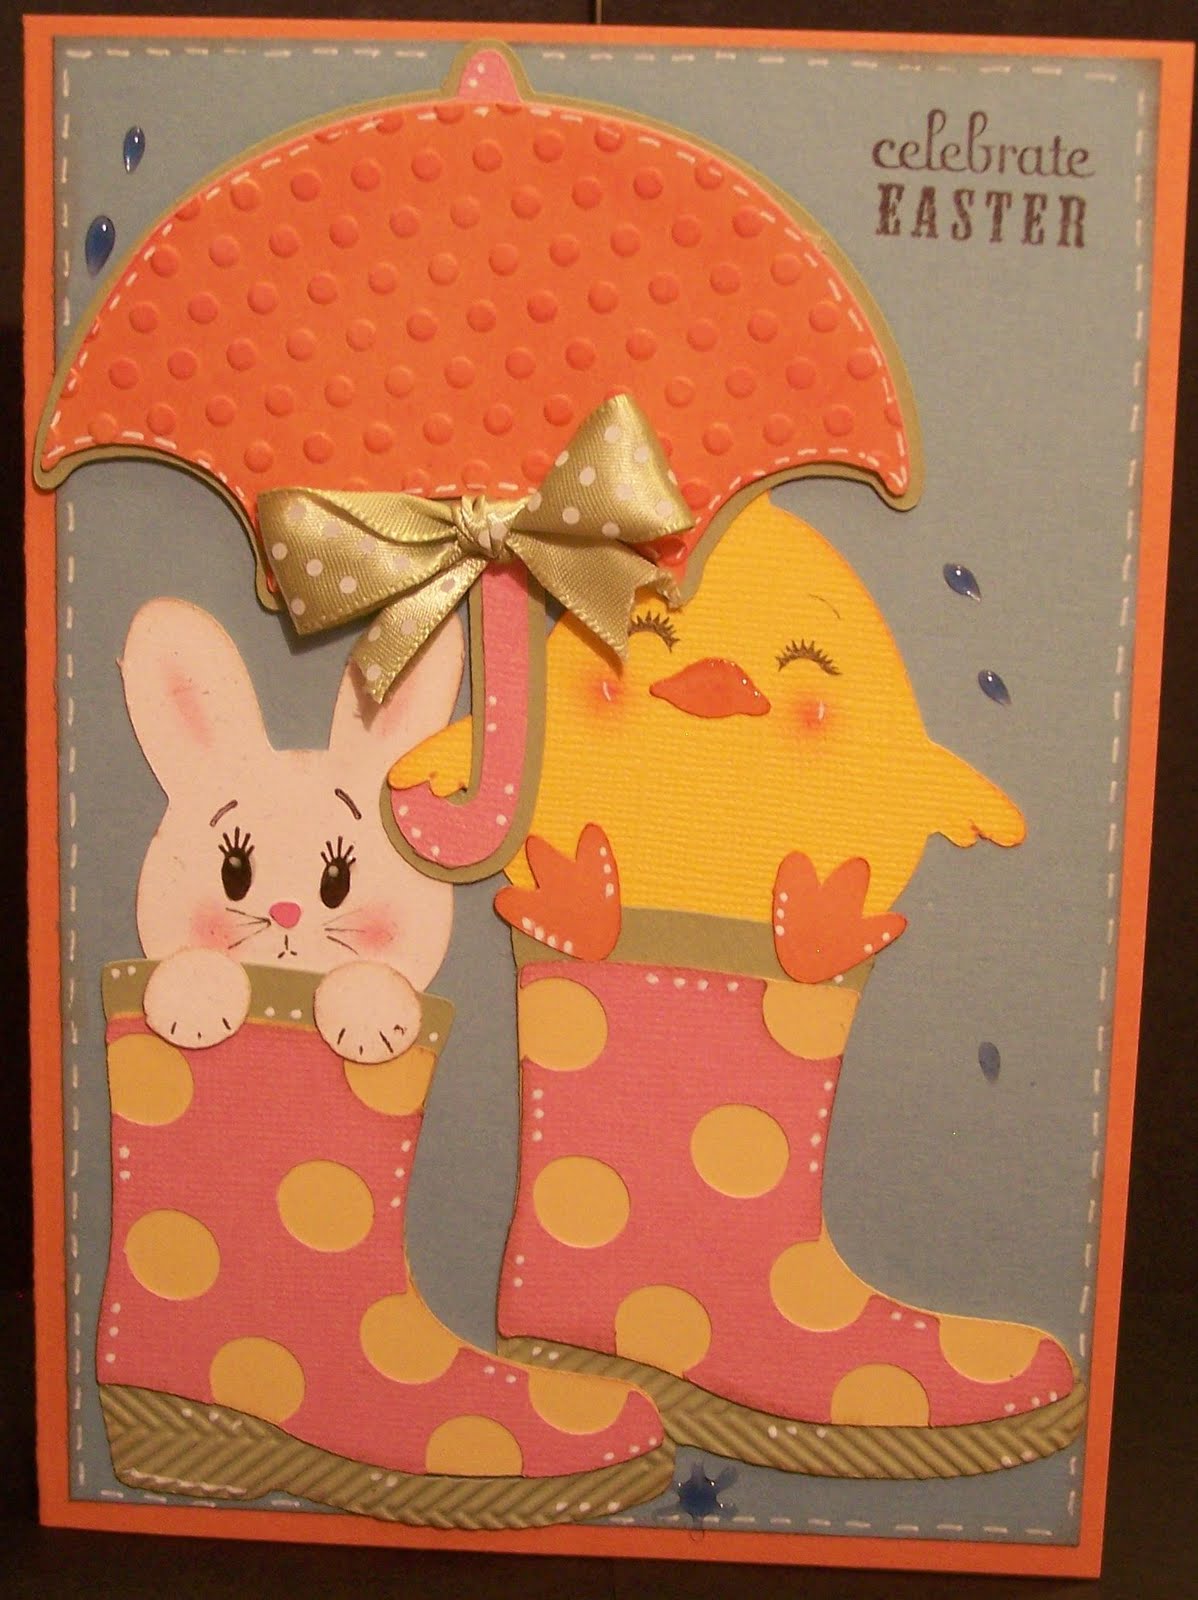
I love how this turned out.  It's both simple and detailed at the same time...make sense? ;)   The Cricut cuts are big and simple, but the sewing and accents makes them seem detailed.  Click on pictures to enlarge.

The juicy summer paper pack from ki memories was perfect for this layout.  I just love the bright and fun colors as well as the patterns and words.
The Cricut Preserves cartridge is all that's needed for this layout.  Even the tag is cut from it.
I did use a Martha Stewart border punch for the lace or doily border that's behind the watermelon and tangerine on both pages.
 

Now for a couple of fun and fruity cards
Solid color cardstock is from Paper Trey Ink.  Pink polka dot paper is from the juicy summer paper pack.

Green paper on apple card was embossed with the Cuttlebug Polka Dot embossing folder.  Martha Stewart border punch on apple card and machine stitching around mats for added cuteness. :)

Wednesday, May 25, 2011

CRICUT PRESERVES - EMBELLISHING FRUIT

I have always loved the Preserves cartridge and I had so much fun embellishing and bringing to life all the fun fruits that are on it.  I am working on a few cards and a layout using the embellished fruit, but just had to give you a peek now.
Now that I have my own space...I have room for my sewing machine, Yea!  I am the first to admit I need a lot more practice at sewing...especially on photo mats as I can never get my corners to end in the right place.  I found the strawberries to be challenging, too. 

Who would think a pineapple could be so fun and cute?!  The Cuttlebug Houndstooth embossing folder is PERFECT for the texture of the pineapple.

Glossy Accents is the perfect accent to bring out the fruit seeds


I will post the completed projects soon.  Also, as soon as I get a nice sunny day I will get pictures of my craft room posted.  It's been so cloudy and dreary here.

Tuesday, May 17, 2011

UNDER CONSTRUCTION - NEW CRAFT ROOM

How about a sneak peek of my new craft room...can you believe the colors? LOL!  Actually this is my son's old room (yes, he still lives at home...just changed rooms).  Anyway, he is a Dallas Cowboys fan so it's painted in navy, white and silver and at this time I just do not feel like repainting it.  So for now the colors will remain and I will just have to add a splash of Cricut green or some other fun color here and there. :)


View as you enter the room
Now I still have a lot to do as you can see in the photo.  Every time I try to get my son or husband to help me hang my embellishment center on the wall they get real busy...you know they have to pet the cow...hug the dog or kiss the cat...hee, hee.  Don't worry...I will get them cornered and they will help me! ;)
I have the perfect little corner for my Jet Max cubes and embellishment center.  My other stack of cubes fits perfect beside the closet door.


I love that I now have room to have all three of my tables set up and room for my cartridges.  Everything was so crowded and squished together before.  It's nice to spread out a little.


My main work table with supplies close at hand.


And finally my cozy little closet. :)

This was suppose to be a sneak peek, LOL!  When I get it clean and everything in it's place I will take some better pics and post.

One other exciting thing...I did end up getting the E2 Cricut.  When it came out on Cricut.com my sweet family said to get it for my Mothers Day...yippee. ;)  It just came today so I've not even got to play with it...yet.  

Thanks for listening to me ramble.  I promise to get some fun projects posted soon.  I really want to make another shape album as it's been a long while.  Have a Great Day...see you again...soon!     

Friday, May 13, 2011

B is for BEAUTIFUL - KATE'S ABC'S

Kate's ABC'S has to be one of the cutest cartridges yet.  It is the only cartridge needed for the entire layout.  I created the mirror by using the frame on pg. 68 of the handbook and welding the table from pg. 65 so only the legs show.  The original frame had holes around the edge of the oval and I used my Gypsy and the hide contour feature to hide them.

The little girl is on pg. 52.  Using a pair of scissors separate her from the stroller and grass. 
The hair brush in her hand is on pg. 65.


Mothers Day Card
I made this step card for my mom and never got it posted.  It is also from Kate's ABC'S.

Friday, May 6, 2011

CARD MADE WITH CRICUT IMAGINE

Using the Cricut Imagine and the Imagine More cartridge made this card so quick and easy to make.  Print and cut the bird frame.  Add a little ribbon, adhere to your card and stamp sentiment in the middle.  So Easy!  

Here is a fun summery card using Life is a Beach  cartridge.  I got a little Stickle happy, but is sure is bright and cheery! ;)
Sentiment is stamped on a tag that was punched with an EKSuccess punch.

Thursday, May 5, 2011

Side Step Stair Card

This is my first try at a stair card and I must say... I'm hooked!  It was so much fun...even though it took me a couple tries to get the hang of how to fold the stairs.
My friends daughter is graduating this Saturday.  I know graduation is to look ahead, but I decided to let this card reflect on some of her high school achievements as she moves forward.


Cricut Cartridges:  Base Camp & Everyday Paper Dolls

Monday, May 2, 2011

COMPLETE LIST OF CRICUT CARTRIDGES

I've been working on this list for awhile now and I think I finally have all the cartridges listed through Hello Thursday April 2011.  If you find I am missing any please let me know.  Click HERE to see list.  In the future if you scroll down the left side of my blog to the picture of Cricut cartridges and click on it...it will take you to the list.

Wednesday, April 27, 2011

Sweet Shoppe Window Card

Fun card made with Birthday Bash and My Community Cricut cartridges.  If I were to make another I would make the font bigger on Sweet Shoppe as it's a bit small.  Liquid Pearls in white used for accents.  Candy Cane Stickles for cherry.
Scallop top is from My Community and is placed on a hand cut "window".  Card is 5x7.
Sundae is from Birthday Bash...embossed with D'vine Swirls and hearts (from Love Language set) Cuttlebug embossing folders.

Sunday, April 24, 2011

Happy Birthday - Cricut Contest Entry

Provo Craft is launching the new E2 Cricut on HSN this Monday night / Tuesday morning.  They are also celebrating their 5th birthday.  In honor of it all they held a contest and will be giving away 5 E2 machines.  The contest was to create a one page birthday layout and you could submit up to 3 layouts...I only had time to complete one.  I've seen some Great entires already...glad I don't have to choose. :) 


I wanted to show the versatility of the Cricut cut with this little one in the high chair from A Child's Year cartridge.  I chose to highlight the party hat and the cupcake and leave the rest of the image as the silhouette it was intended to be.
Banners are very popular right now so I thought it would be the perfect topper for this layout.
I love the Storybook cartridge for doing big fancy letters. 

Monday, April 11, 2011

More Easter Cards

This card was made with the Simply Charmed Cricut cartridge

Here's a couple cards with an oldie, but a goodie...Stretch Your Imagination
In the pictures the cards look more muted than they really are.  Could not get good pictures...ugh!

I changed this card up a bit.  Can you tell what's different?  Ok, I will tell, LOL.  In the post below you will see the chicks feet are sticking up out of the boot and I decided to make it look like they were hanging over the edge of the boot.  Not that it really matters...either way looks fine.