Monday, August 20, 2012

New Arrival Explosion Box ... With a Cute Twist

This is a lost project ... meaning I started working on it about two years ago and got sidetracked before completing it.  It's suppose to be a babies  first home and the inside a nursery, but the inside was never finished.  I recently came across it and  decided to post it ... in it's unfinished glory ;)... so hopefully you could get inspired from the idea.  Click on pictures to enlarge.  Here it goes...


The twist is the cute little "flyover" as I like to call it.  An airplane flying overhead to welcome home the new baby.  Plane is from Cricut New Arrival.  Clouds are from Pooh & Friends.  I inserted small floral wires into the roof and attached the clouds and plane to the wires.  You can then bend them how you like.
 The wires cannot be seen from the underside of the lid as I created the roof and adhered it to a standard explosion box lid ... if that makes sense.  So the wires are hid between the top of the lid and the roof.  The wires do move around a bit, but a little hot glue might have taken care of it. Clouds are flocked in blue, then outlined with white Liquid Applique for added dimension.
 The box is a little beat up and the edges are somewhat bent. I seem to have trouble getting the edges to line up and stay perfectly flat, anyway. :/

 I used my Gypsy or DS one to create the nursery window.  I then added vellum for the "glass" and added decorative cardstock to complete the look.

WARNING...the inside is not done and leaves a LOT to be desired. But you can kind of see where I was going with it.  Needs a lot more color and detail.
  I got as far as a simple crib and rocking horse, but there is soooo much more you could do to make an adorable nursery.  


Ideas for other explosion boxes with cute little fly overs ... 
Halloween ... with a witch on her broom and a big moon...Christmas ... with Santa's sleigh and reindeer.  A tooth fairy would be cute, too.  Lots of possibilities.  Hopefully you have been inspired to create one.  I would love to see it if you do. :) 

Sunday, August 19, 2012

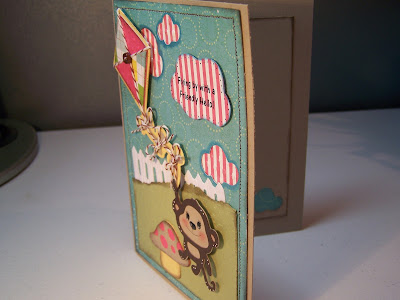
Create a Critter Card

I tend to lean towards cutesy style projects.  That's probably why I love the Cricut Create a Critter cartridge so much.  It is full of cutesy images.
 Create a Critter - kite, monkey and mushroom.
Pooh & Friends - clouds
My Community - fence
The clouds were created by using the negative.  I cut them out of the blue cardstock and lined the back with the pink stripe cardstock.  I used my Gypsy so I could place the clouds right where I wanted them.  I also inked the edge of the clouds on the negative in a shimmery blue ink.  The sentiment cloud is made by using the positive cut with a computer generated sentiment.  Lots of Pop Dots were added for dimension.

Saturday, August 18, 2012

Easy Mailing Cards

I made these cards with the thought of mailing in mind.  So many of my cards require a trip to the post office for additional postage due to ribbon bows and buttons that will not go through the postal machines.  These cards are nice and flat so I can mail them right from home.

Sentiment is a stamp from my stash
Mat for the sentiment is from the E2 preloaded cartridge, Cricut Essentials.  Banner is from George & Basic Shapes.  Hearts are a small punch.  Background is embossed with the Cuttlebug Brocade embossing folder.  I really like the color combo of this card... cardstock is SU! Early Espresso, Crumb Cake & Rose Red.  Paper Trey Ink ribbon in Hawaiian Breeze. 

Cricut Love You a Latte cartridge for the latte.  George & Basic Shapes for the ovals.  EKSuccess punch for the photo corners.  


Friday, August 3, 2012

Bushel of Love

Here is another card to add to my stash for Kara.  I have been trying to use up some of my scraps so you've been seeing a lot of these papers. :)

Doodlecharms Cricut cartridge was used for the bushel basket and hearts.  Cuttlebug embossing folder for embossed hearts behind the large heart.       

 Inside of card 

Wednesday, August 1, 2012

Simple Cards With Punches

Gasp ... I actually made a couple of cards and did not use my Cricut!  I need a few cards on hand to send to my daughter ... who's leaving for grad. school in a couple of weeks.  She will be several hours from home and I must have cards ready to send to her on a regular basis.  So I was going for really quick and simple and this is what I  came up with.

This card  was created using some of my paper scraps and one of my favorite stamp sets by Pink Paisley.  I love this sentiment and feel that Kara is walking in the sunshine as she pursues her goals.
Sentiment punch - EKSuccess
Border punch - Fiskars - Sunburst (I think that's the name)

I love this paper by Cosmo Cricket.  Punch is a Fiskar's border punch called Apron Lace.
  
Inside of card - photo corners are an EKSuccess punch.